Novo Hub
Adding New Provider
This module handles all provider related task in-house.
Click on Provider/Create Provider.
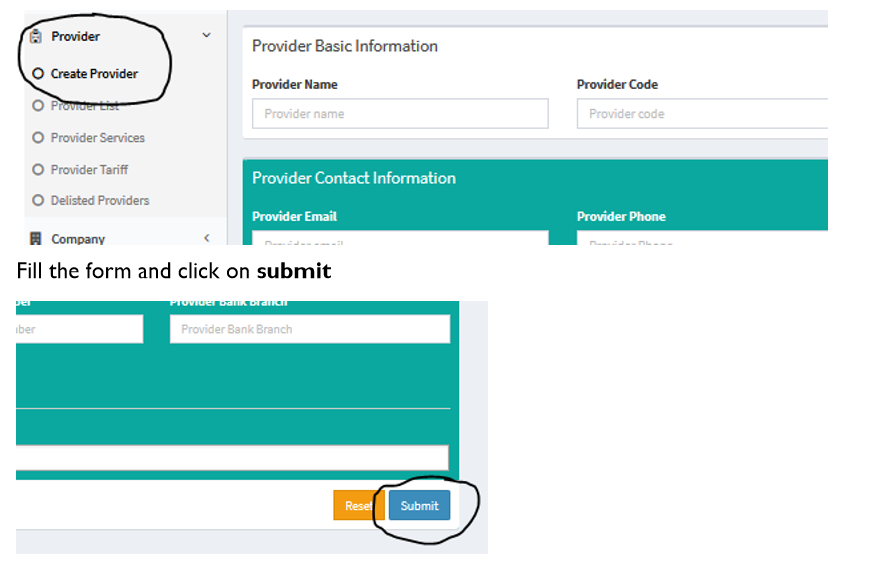
Adding New Provider
This module handles all provider related task in-house.
Click on Provider/Create Provider.
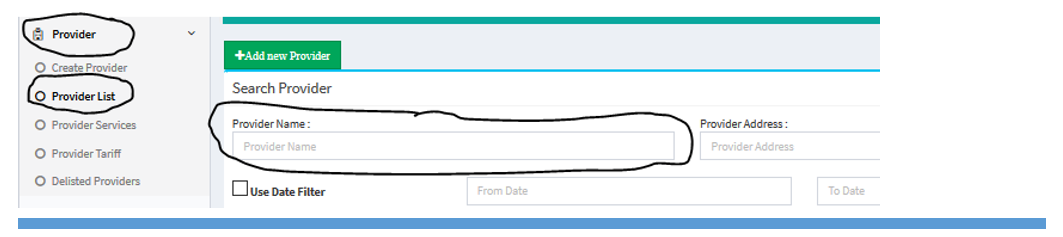
Viewing and managing existing providers
To view existing provider, click on provider/provider list.
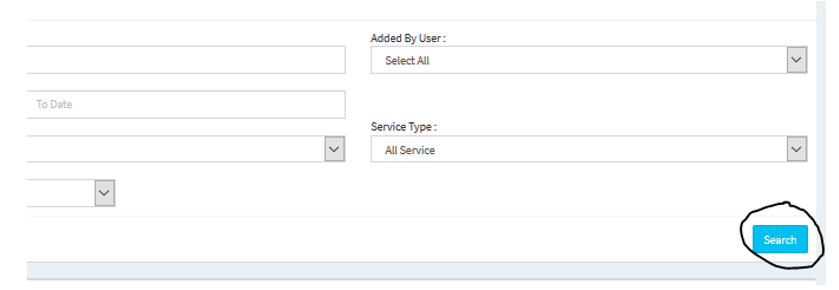
Type the provider name and click on search.
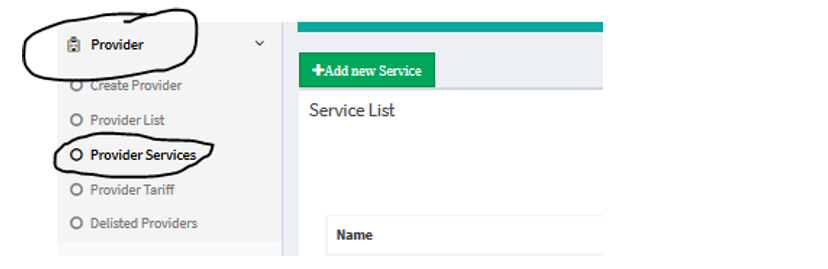
Configuring Provider Services
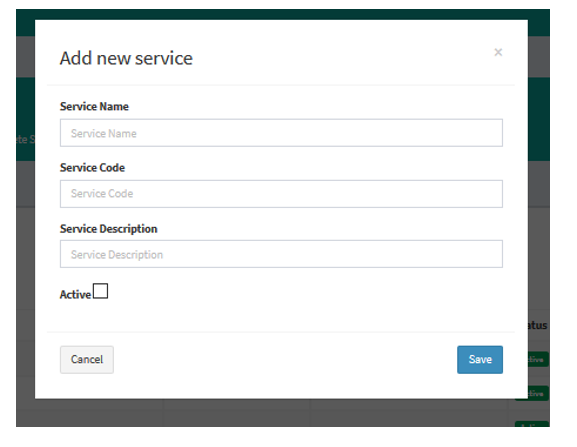
To configure new service not on the system already, click on Provider/Provider services/Add new Service.
Type the provider name and click on search.
Fill the form that appears and click save.
Adding and managing provider tariffs.
Convert the tariff to Microsoft Excel if it’s not in excel format and remove all borders.
Create five (5) columns: Item name, Unit, Price, Authorization required & Remarks. (NB: the template is case sensitive).
Delete all empty spaces (either rows or columns).
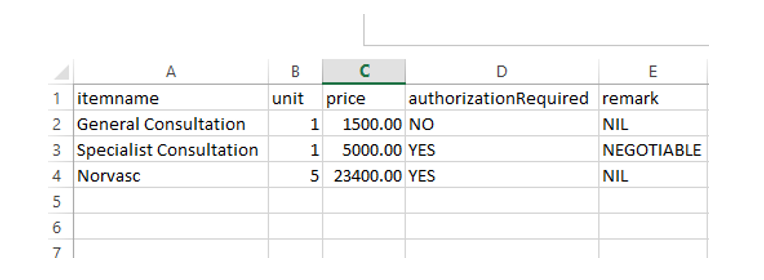
Format the price column as number into 2 decimal places (e.g. 100.00).
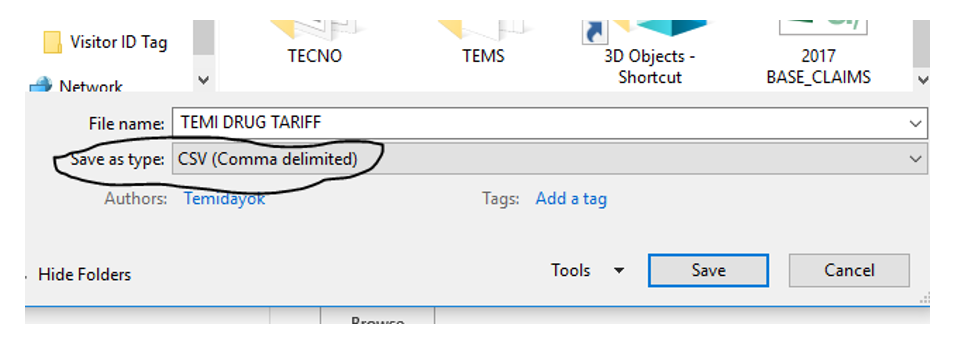
Save document in CVS (Comma Delimited) format. Click “Yes” to any questions that may come up.
Re-open the data and expand all columns, then save again.
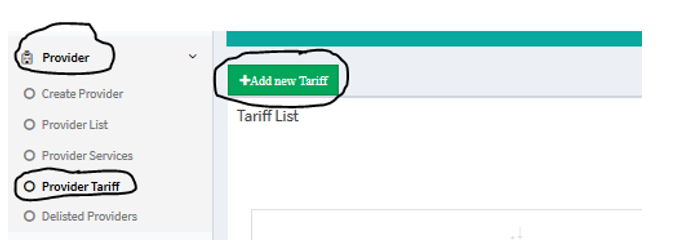
Go to the hub click provider/Provider Tariff/Click Add new Tariff to link tariff and Provider.
Fill the form following the format below and save .

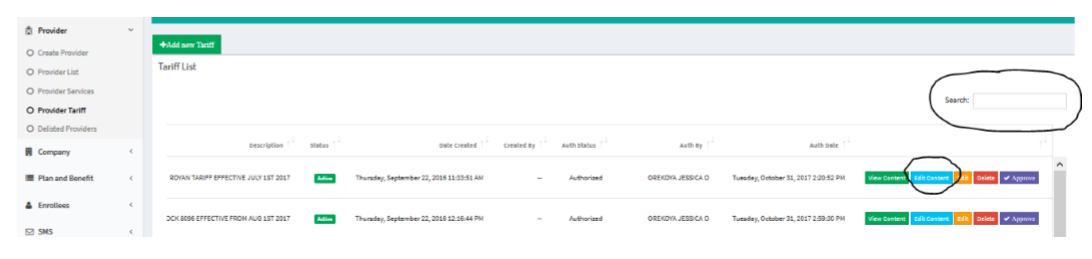
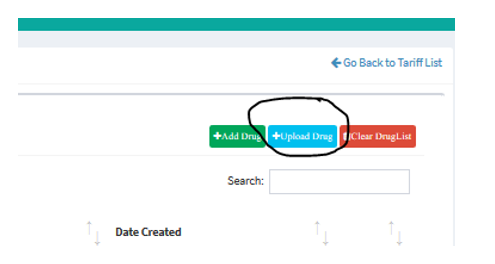
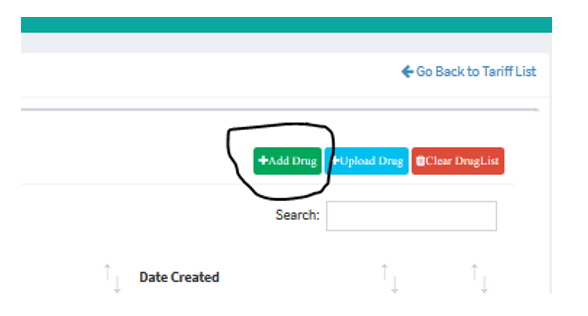
To upload the entire drug tariff, Type the Provider name and search in the Search box.
Click on Edit Content.
Click Upload Drug.
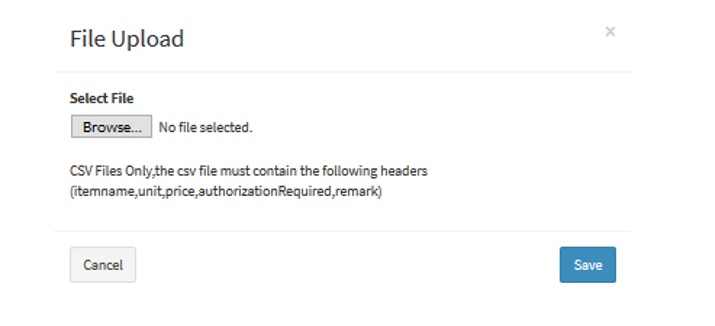
Click Browse to select file location, double click the file and click Save.
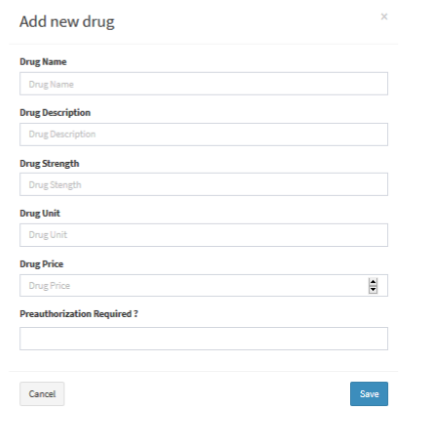
To add a single drug, click Add Drug.
Fill the form below and save.
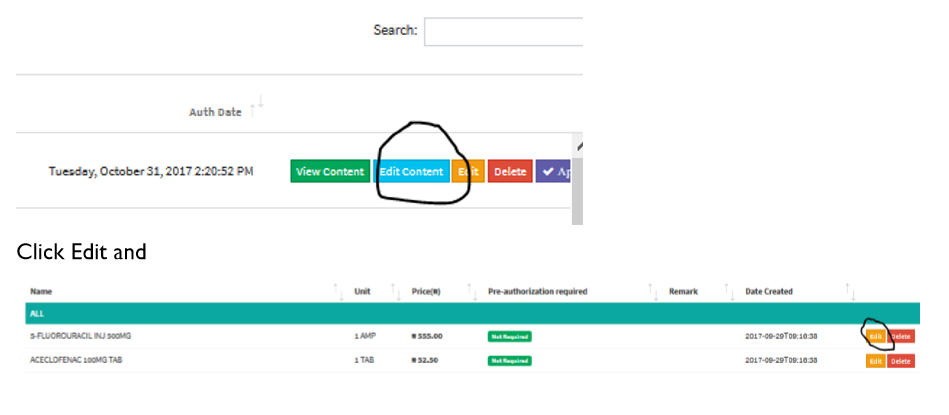
To edit individual line in an existing tariff, search for the Provider in Provider/Provider Tariff/Edit Content.
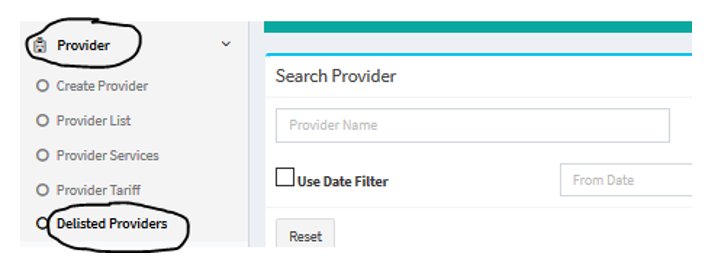
Managing De-Listed Providers
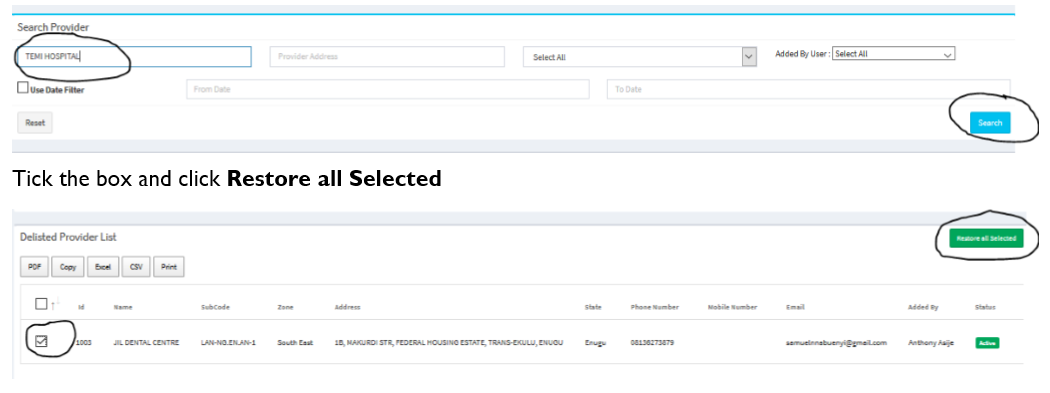
To restore a deleted Provider, click on Provider/Delisted Provider.
Type Provider name and Click Search.
This module handles all client related task.
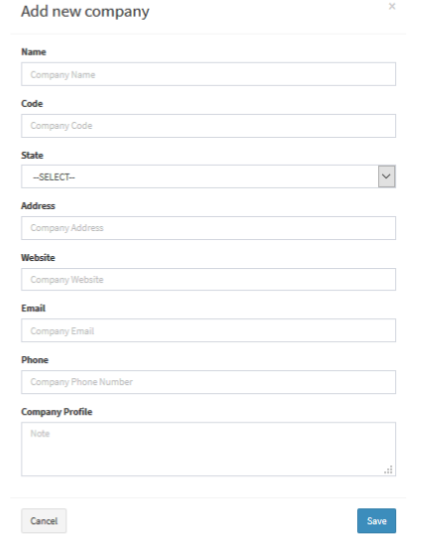
Add new company
To add new company, click Company/Company List/Add new company.
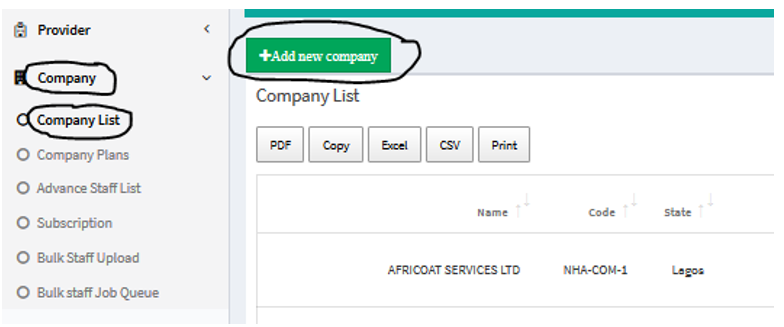
Fill the form and click Save.
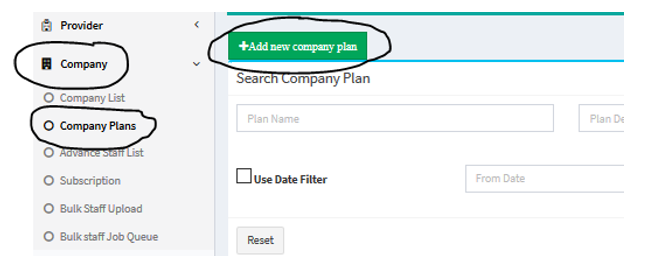
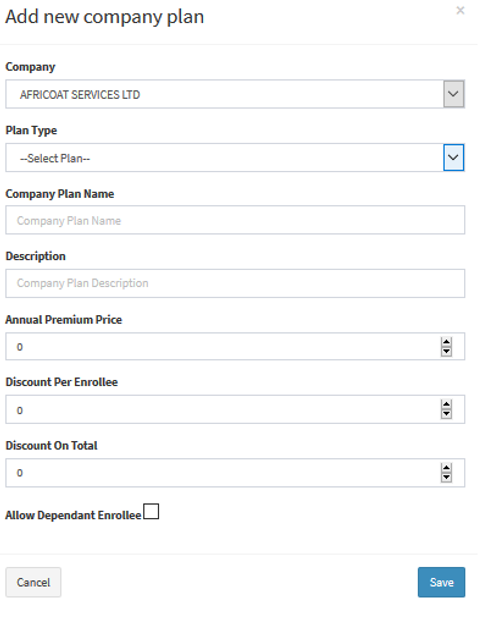
Add Company Plan
Click on Company/Company Plans/Add new company plan.
Select the company from the drop down list.
Select the plan type from the drop down of generic plan types.
Enter the new plan name.
Enter the plan description.
Enter the “Annual Premium Price”.
Enter “Discount Per Enrollee” if applicable.
Enter “Discount On Total” if applicable.
Check the “Allow Dependant Enrollee” when it’s a family plan.
Click on the “save” button to submit.
Add Subscription (Newly)
Click on the Company/Subscription/Add Subscription.
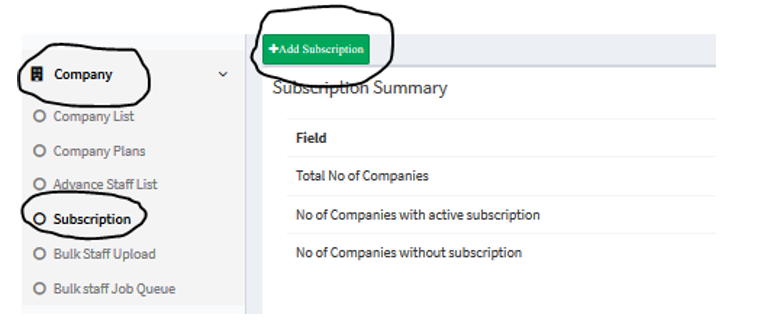
Click on “add subscription” at the top right of the page.
Select the company from the dropdown list displayed.
Select the subsidiary or all subsidiary.
Select the Health plan(s) for the subscriptio.
Enter the start date.
Select the duration (The system will auto-generate end date but you can edit the end date).
Enter note if applicable.
Click on the “Save”.
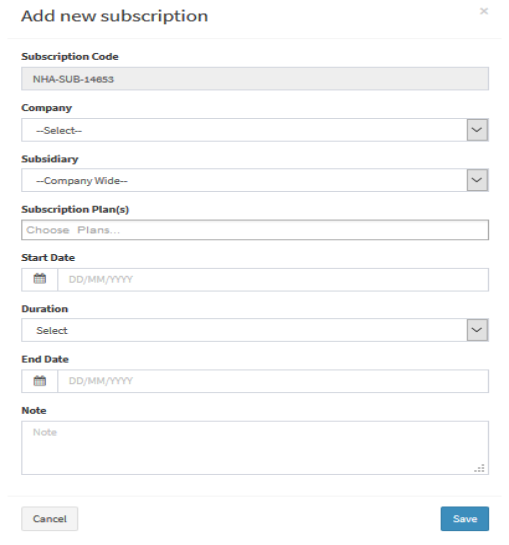
The subscription will go in for authorization by the Head of Service/Regional Head.
Add Subscription (Renewal)
You need to delete the existing subscription and create a new one.
Click on the Company/Subscription.
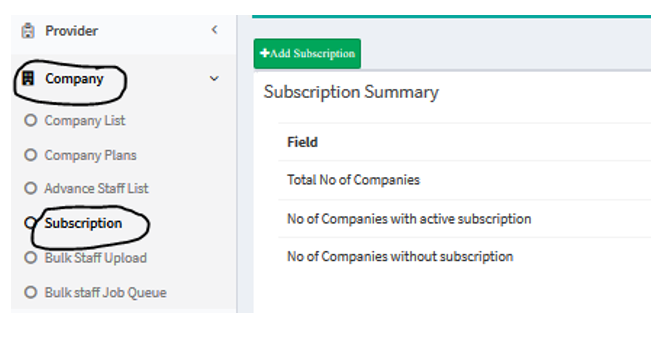
Search for the existing subscription by scrolling down to Subscription List, type the company name in the search field and click on red button (i.e Terminate).
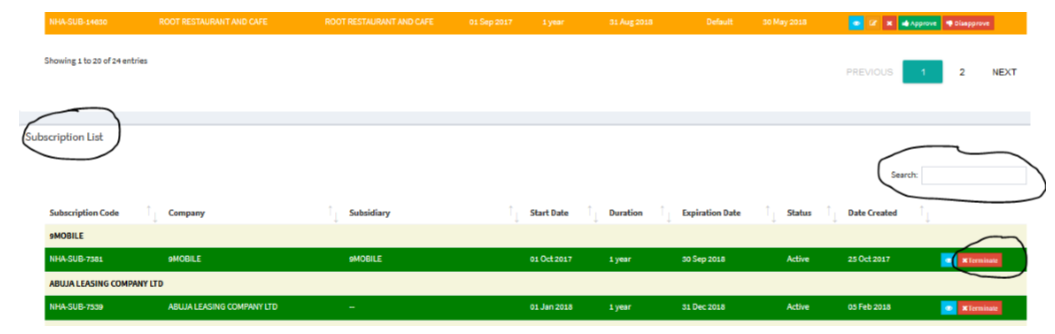
Create a new subscription following the steps above i.e. Add Subscription (newly).
Upload Bulk Staff
Create a 3 column excel sheet using the format below.
The table will not have a header. The columns are Enrollee name, Health Plan id and Staff id.
NB: The 3rd column (Staff ID) is not compulsory.
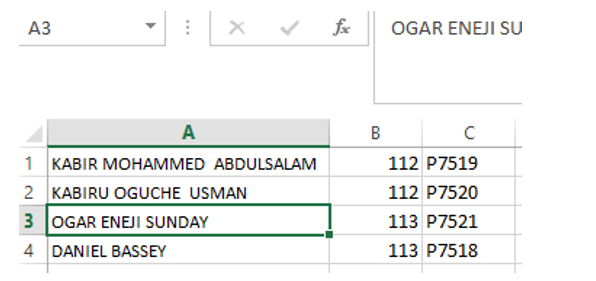
Save the document as MS Excel and close.
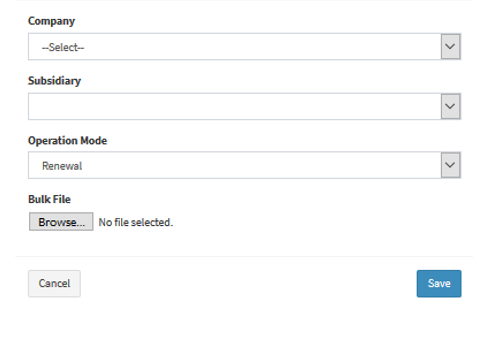
Click on Company/Bulk staff upload/upload bulk staff.
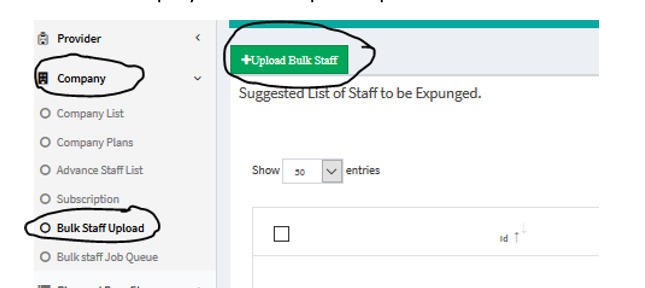
Fill the dialog box as thus:
Select Company.
Select subsidiary where applicable.
Select Operation mode (either Renewal or Addition).
Click on Browse to select file location.
Click on Save to effect upload (NB: A notification is sent to Head Operations to approve the upload before it enters the system).
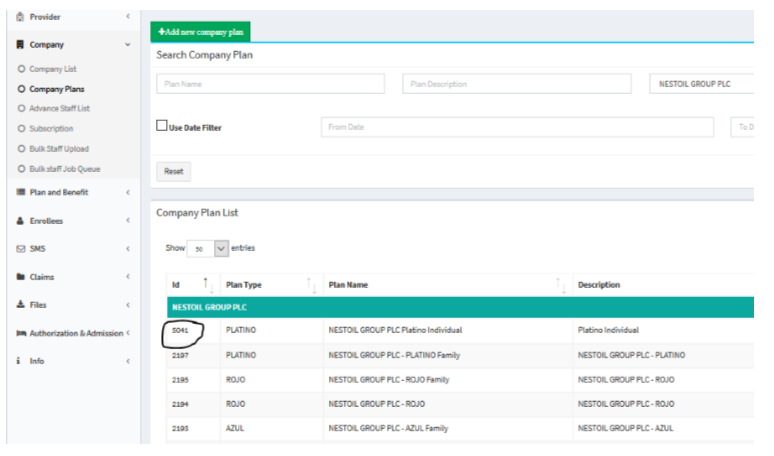
View Health Plan ID
Click on Company/Company Plan
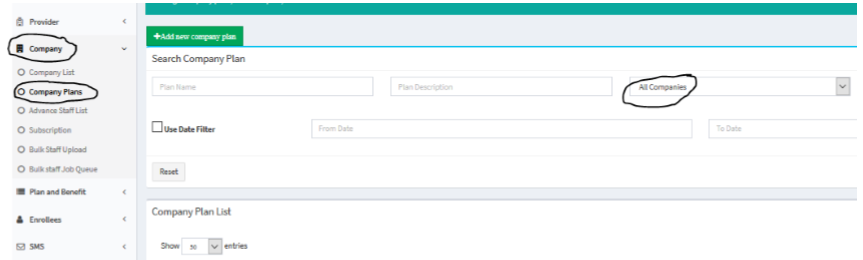
Use the search features to narrow down you search.
The plan ID appears in the first column.
Add Single Staff
Click on Company/Advance Staff List/Add new staff.
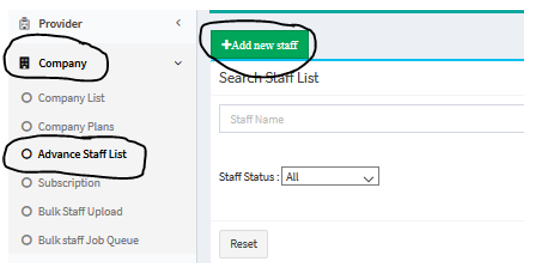
Select the company from the dropdown list.
Select company subsidiary.
Enter the full name of the staff.
Enter staff ID (optional).
Select the staff plan from the dropdown list.
Check the “override staff name check” to enable duplicate name in a subsidiar.
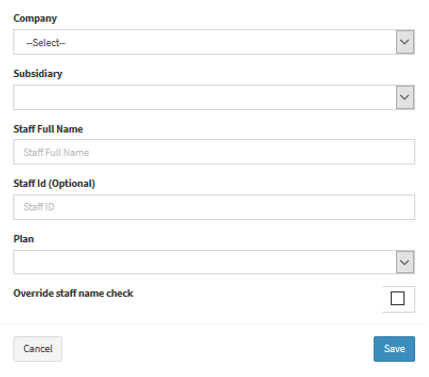
Click on Save
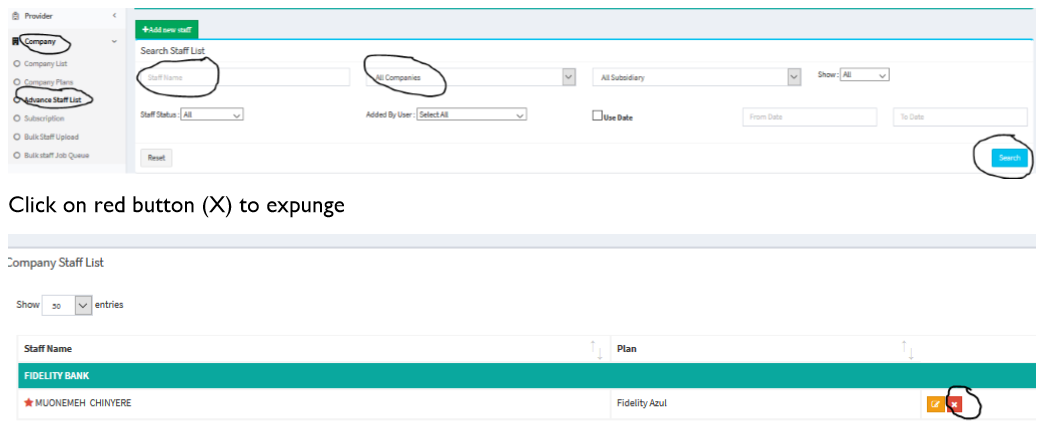
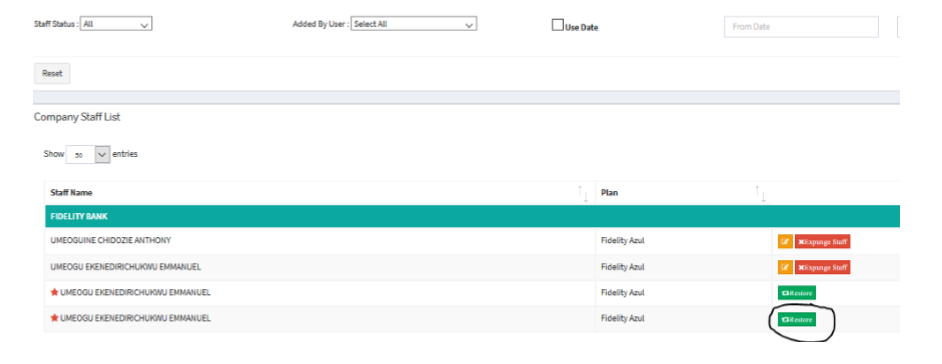
Expunge staff
Click on Company/Advance Staff List.
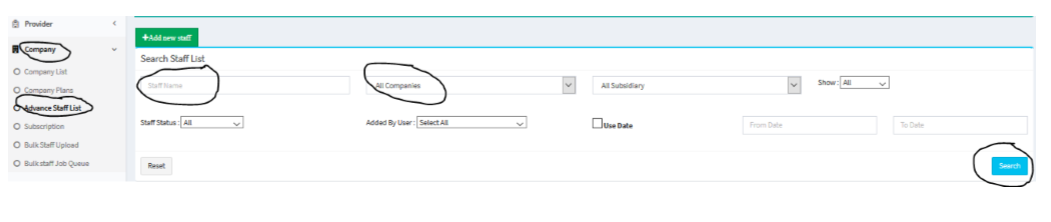
Restore Expunged Staff
Click on Company/Advance Staff List.
Search by
Selecting company
Type enrollee name (NB: Use only one name)
Click on red button (X) to expunge.
Click on green button (Restore) to restore staff.
Search for Enrollee
Click on Enrollee/Enrollee list
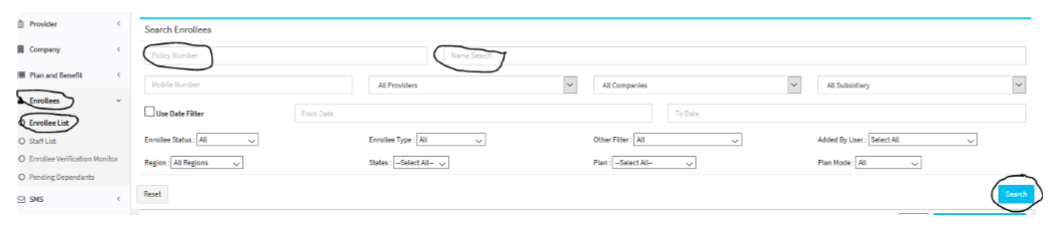
Use either policy number or Name to search.
You could use other search filters to streamline your search.
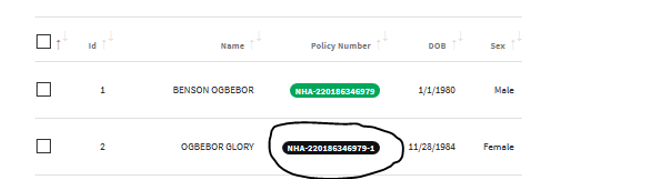
NB: Enrollees with green policy number are Principal Enrollees.

Enrollees with black policy number are dependants (i.e. spouse and children)
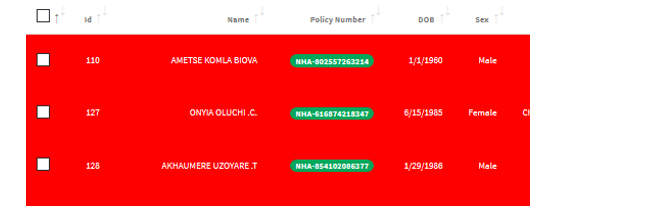
Enrollees in red bar are expunged
View Enrollee Details
Click on the policy number to view other details (e.g. Registration date, benefit table, dependants etc.).
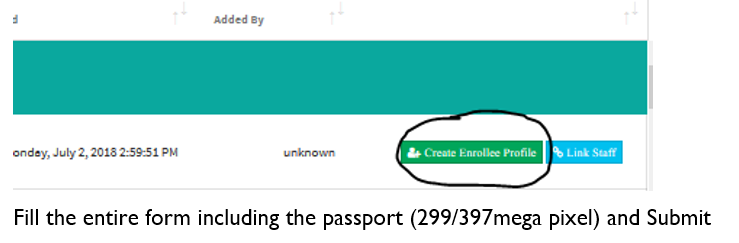
To register an Enrollee
Click on Enrollee/staff list.
Search for the enrollee using the search filters.

Click on Green button (Create Enrollee profile).
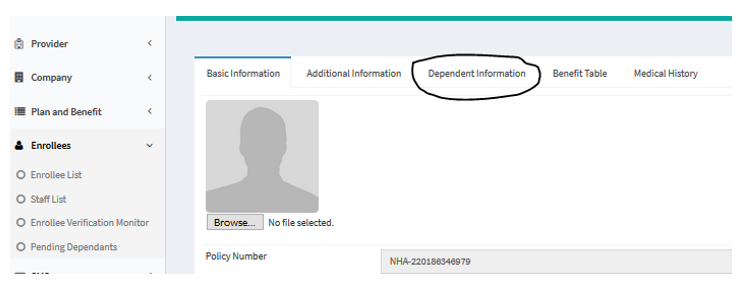
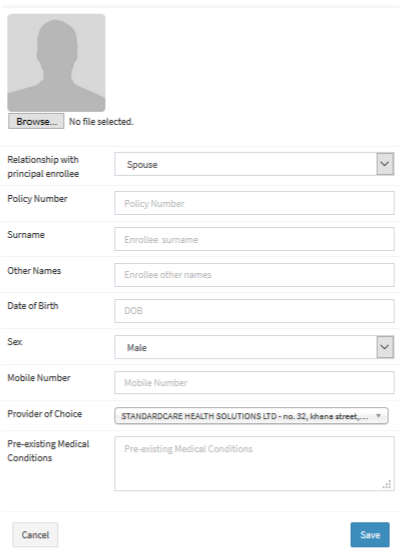
To Add Dependant
Click on Enrollee/Enrollee list.

Use either policy number or Name to search
You could use other search filters to streamline your search
Click on Dependant information
Click Add Dependant
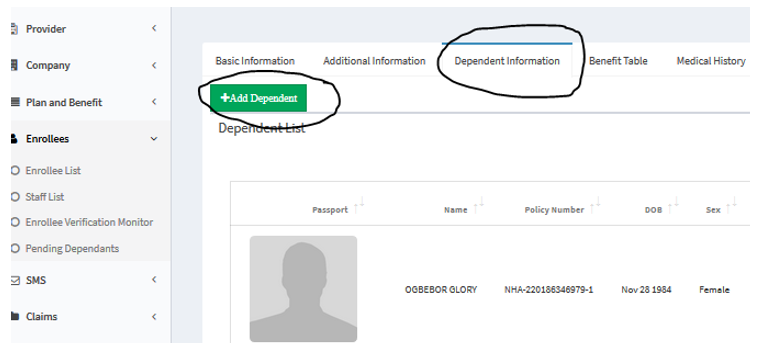
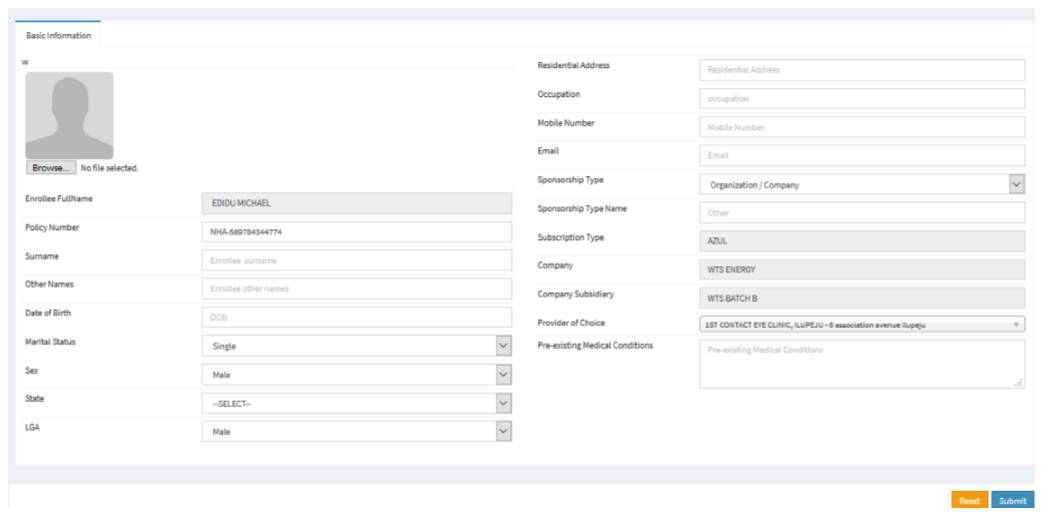
Fill the entire form including the passport (299/397mega pixel) and Submit
Edit Enrollee Information
Click on Enrollee/Enrollee list
Use either Policy number or Name to search
You could use other search filters to streamline your search
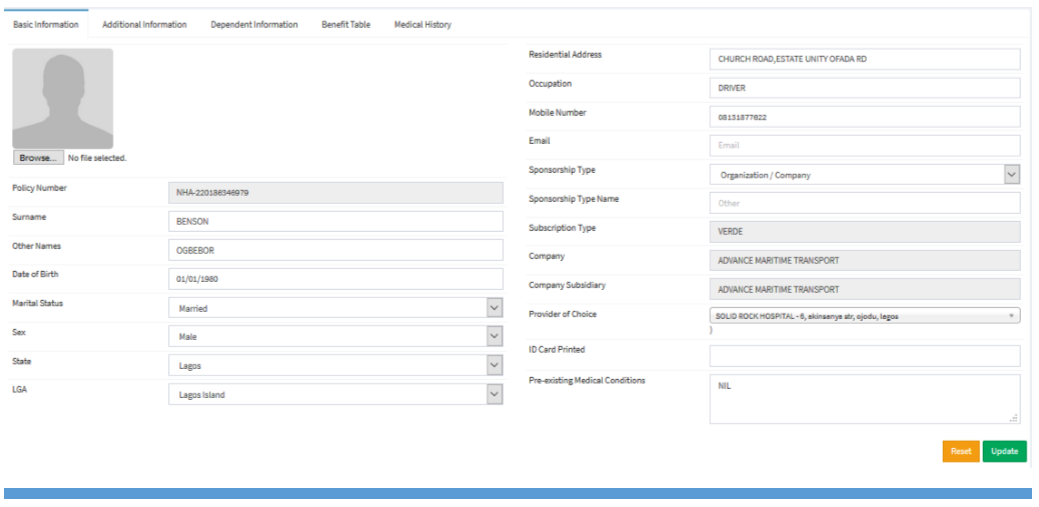
Edit the form as required and click on Update
To Print ID Card
Click on Enrollee/Enrollee list
Use either Policy number or Name to search
You could use other search filters to streamline your search

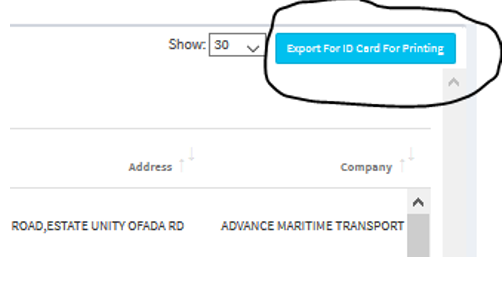
Check the boxes to highlight the enrollees to be printed.
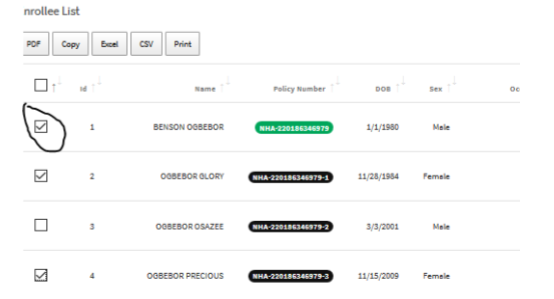
Click on blue button (Export for ID Card Printing) to export information needed to print ID card
Export Enrollee Information to Different Format
Click on Enrollee/Enrollee list
Use either Policy number or Name to search
You could use other search filters to streamline your search
Check the boxes to highlight the enrollees to be exported.
Click on any of the format.
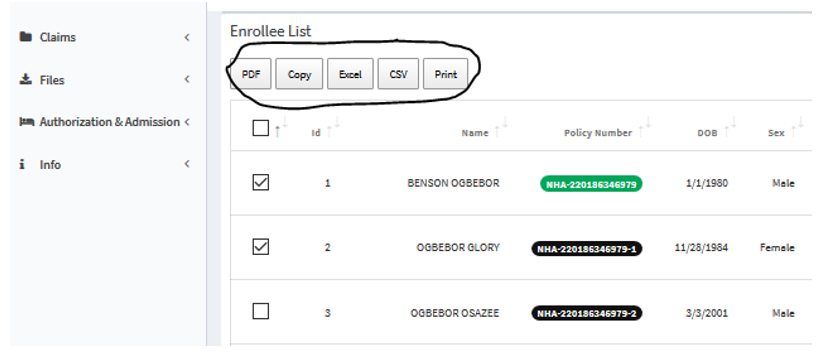
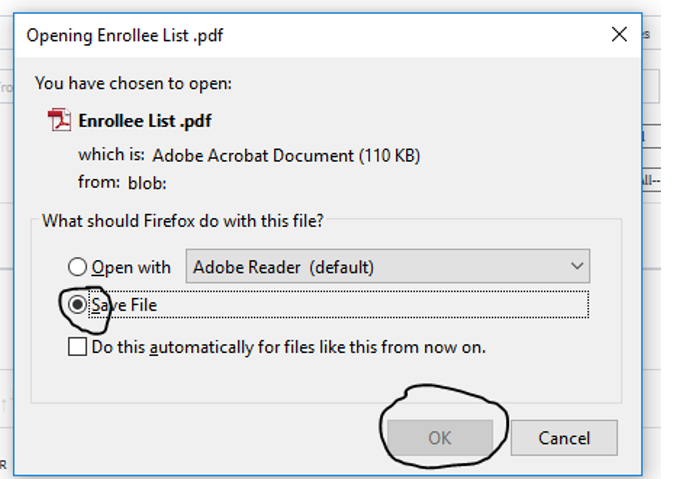
Click Save File and Ok to download
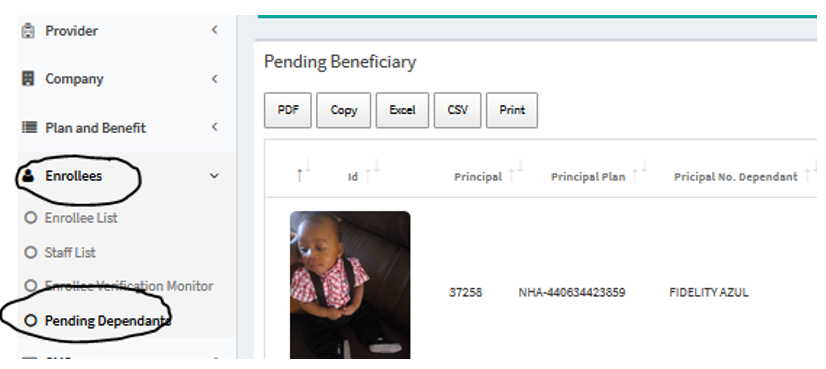
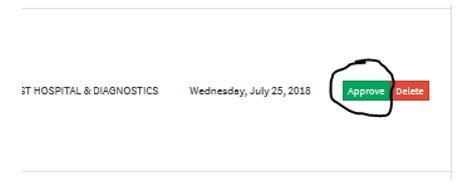
Approve Dependants registered on the Portal
Click Enrollees/Pending Dependants
Copy policy number to confirm if the dependant has not been added before. If yes, click the red button (Delete)
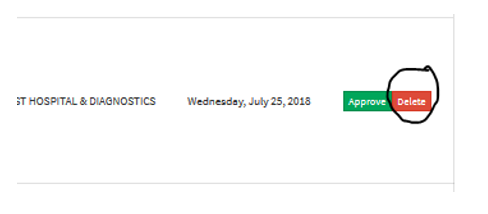
If no, click the green button (Approve) to allow the dependant in the database
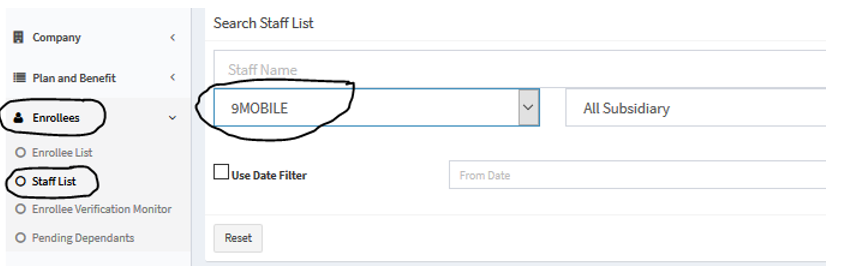
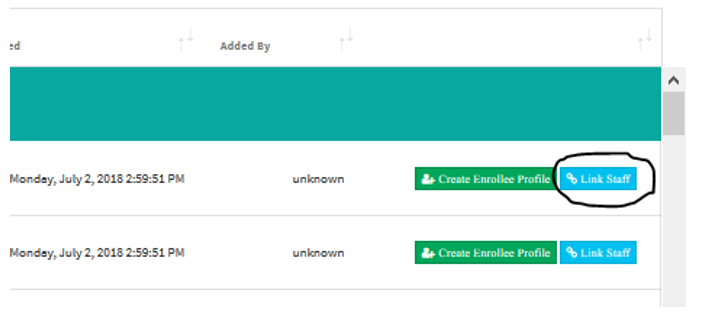
Linking Enrollees at Renewal
During renewal, after a staff list is uploaded and approved, the following step is required to link, Click on Enrollee/Staff List.
filter by company and subsidiary where necessary and search.
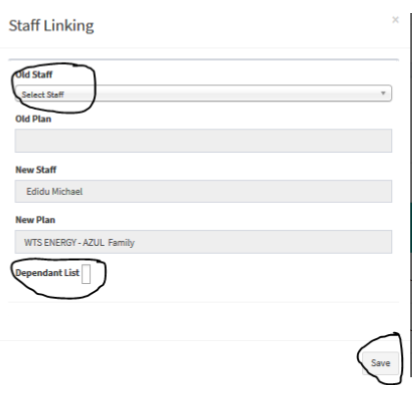
Click on Link Staff
Fill the dialog box (i.e. Old staff and Dependant List) and click Save.
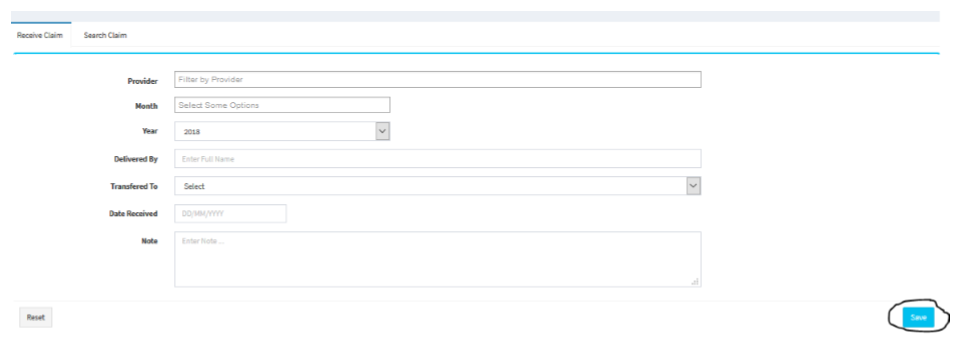
Incoming Claims
To log in an incoming claims, click on Claims/Incoming claims.
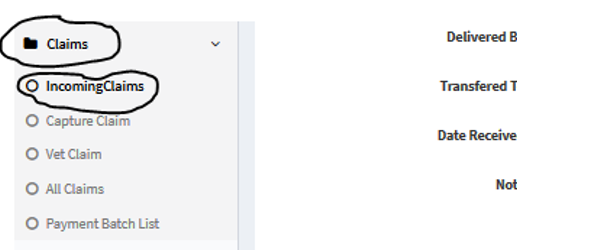
Fill the details appropriately and Save
NB: the claims is batched based on date received.
Incoming Claims
Click on Claims/Incoming claims
Click Search Claim
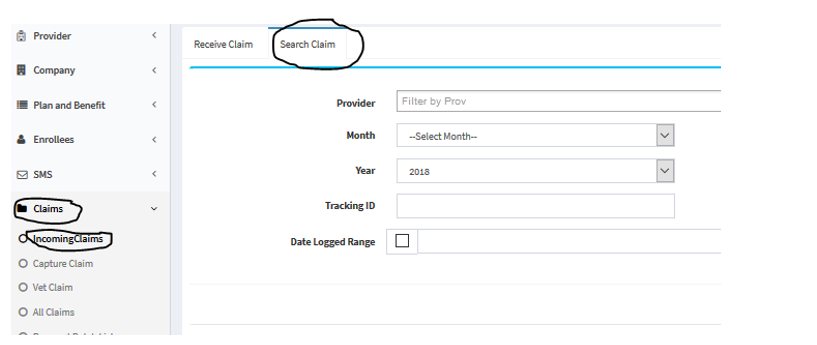
Use the search filters to pull desired result.
Edit Incoming Claims
Click on Claims/Incoming claims
Click Search Claim
Click on Yellow button (Edit)
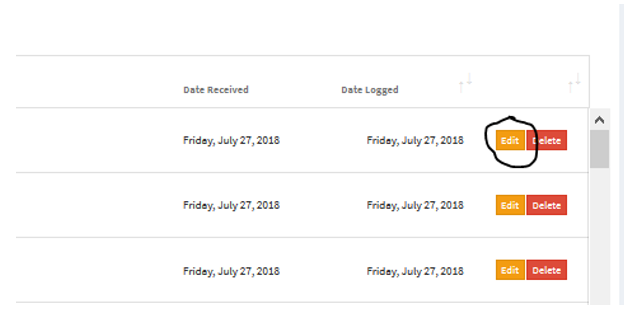
Edit as desired and click Save
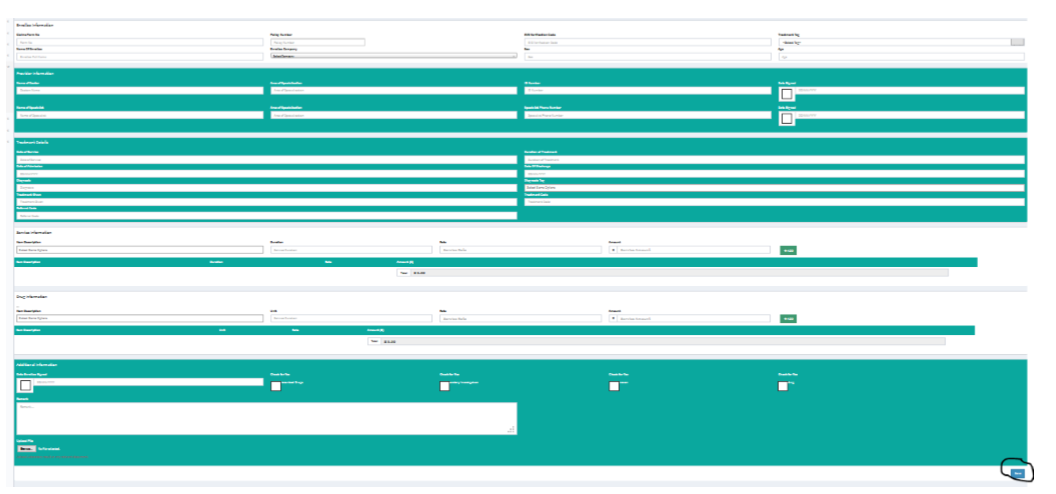
Capture Claims
Click on Claims/Capture Claim
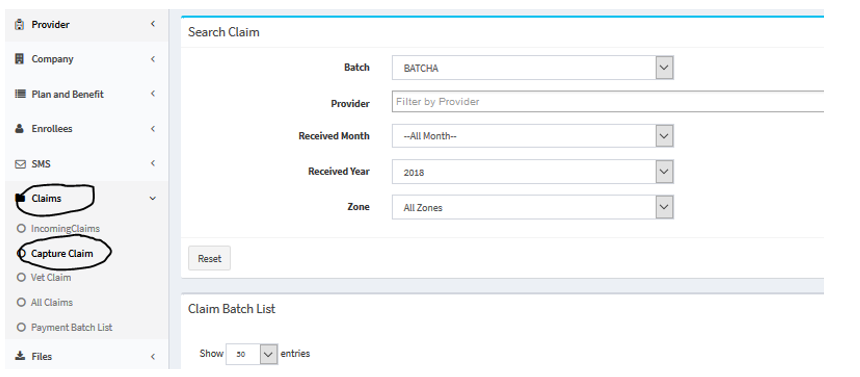
Use the filters to streamline your search
Click on Capture Claim
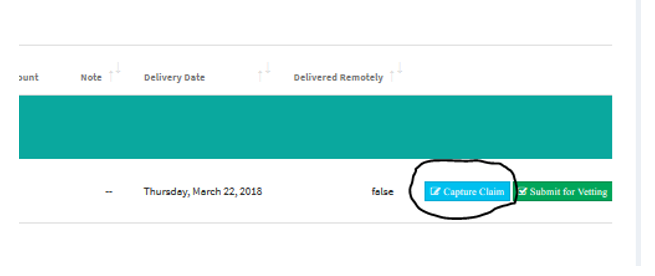
Fill the form appropriately and Save
Capture Claims
Click on Claims/Capture Claim
Use the filters to streamline your search
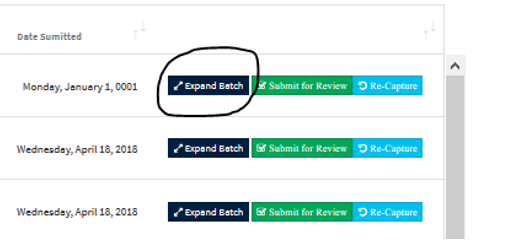
Click on Expand Batch

Click on Edit
Edit claim as desired and click Save
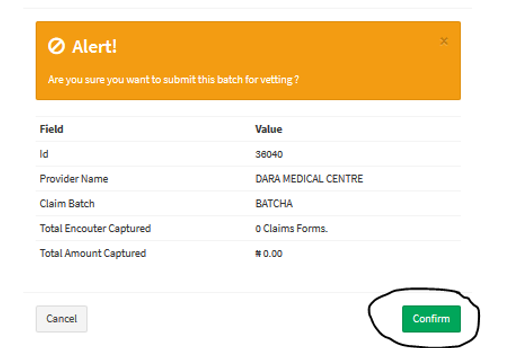
Submit Claim Batch for Vetting
Click on Claims/Capture Claim

Use the filters to streamline your search
Click on Submit for Vetting
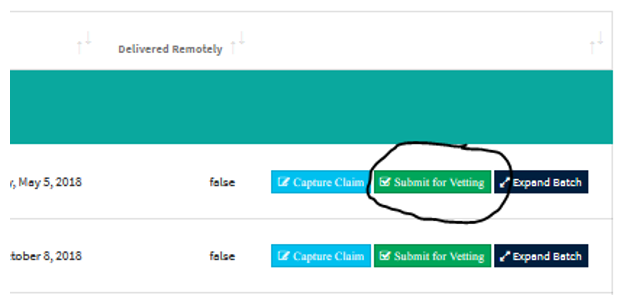
Confirm that you have captured correctly and click Confirm
Re-capture Claims/Edit
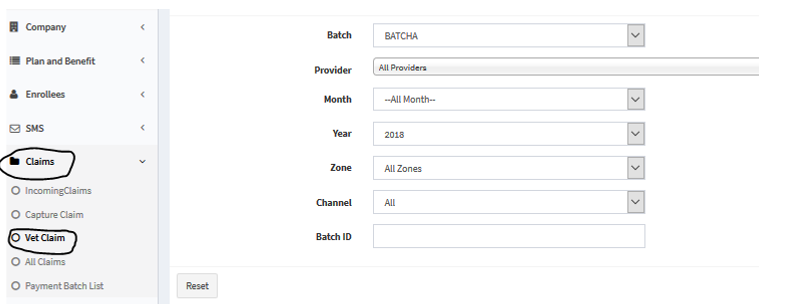
Click on Claims/Vet Claim
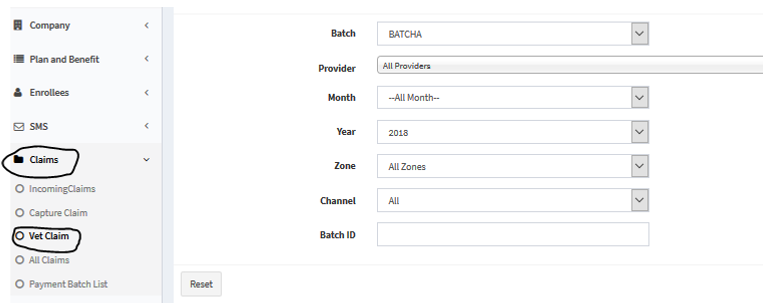
Use the filters to streamline your search
Click on Re-capture to send bill back to capturer
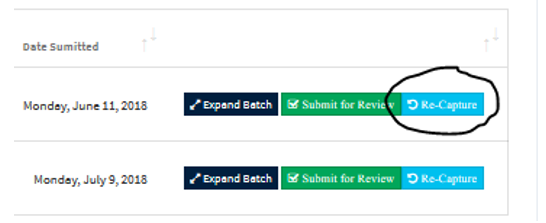
Capturer can then add more encounters or edit existing encounters and the submit for vetting.
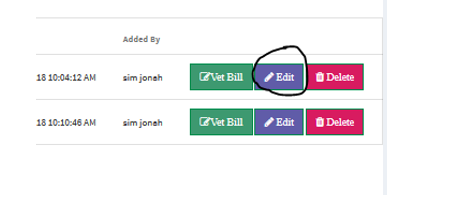
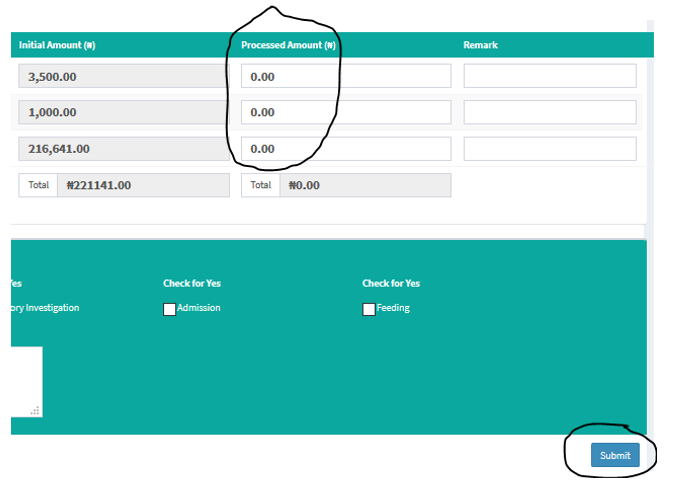
Vetting Bills
Click on Claims/Vet Claim
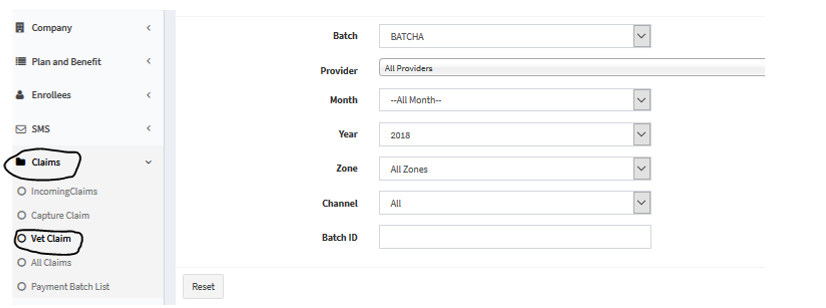
Use the filters to streamline your search
Click on Expand Batch
Scroll to the right and click on Vet Bill to vet individual bill
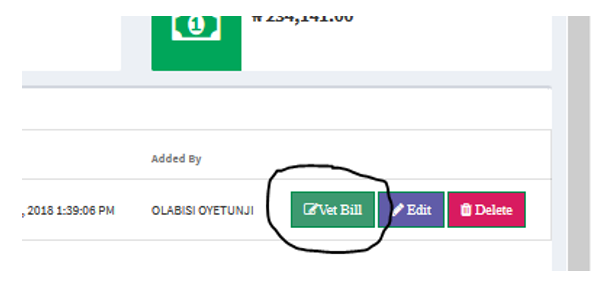
Input processed amount, remark and click Submit
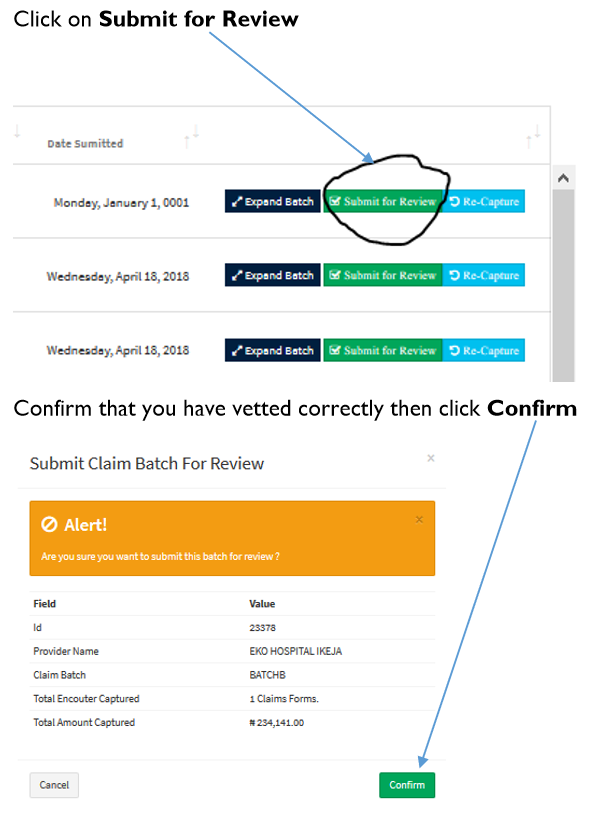
Submit Vetted Bills for Review
Click on Claims/Vet Claim
Use the filters to streamline your search
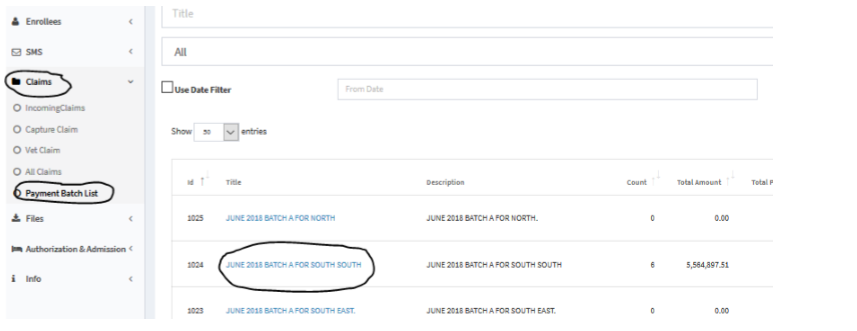
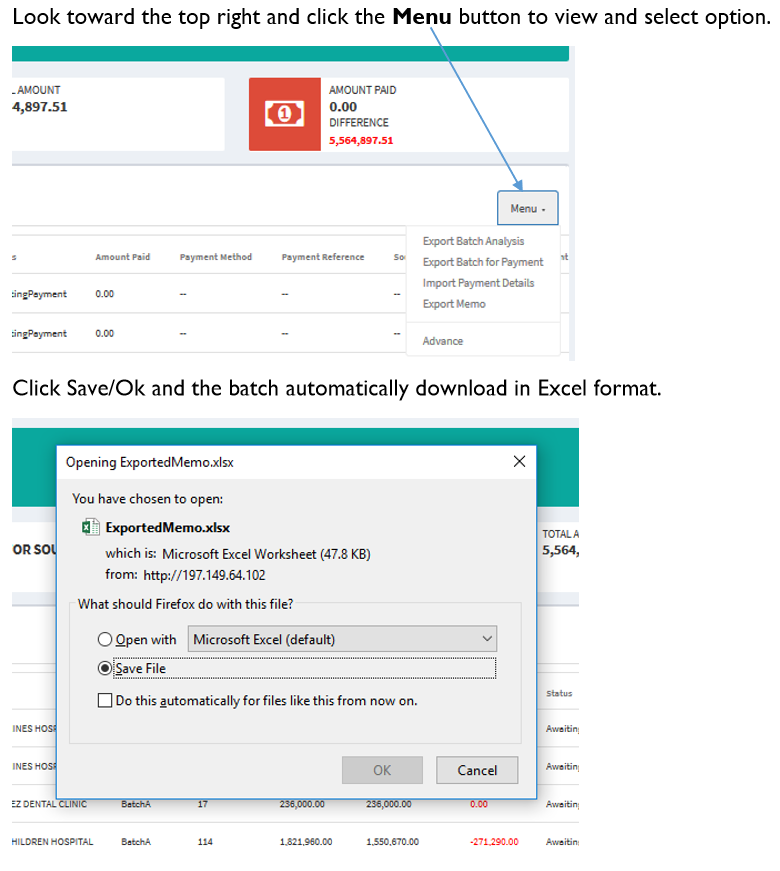
Export Batch for Analysis, Payment and Memo
Click on Claims/Payment Batch List
Search for the batch and click on the Title
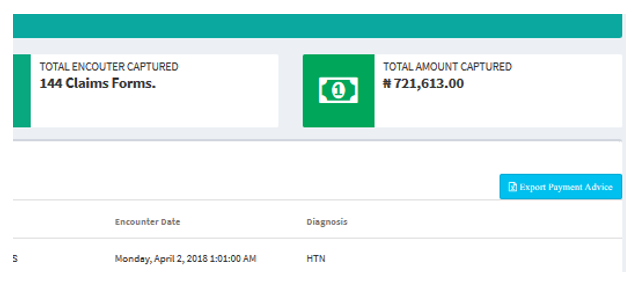
Export Payment Advice
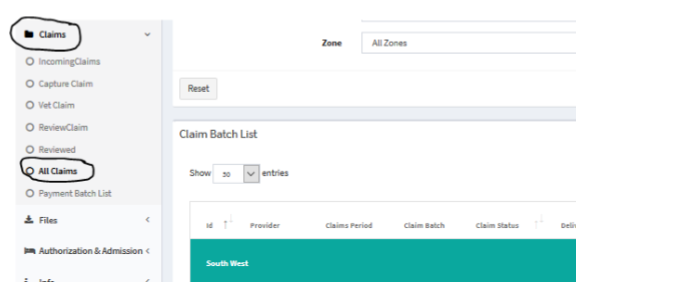
Click Claims/All Claims
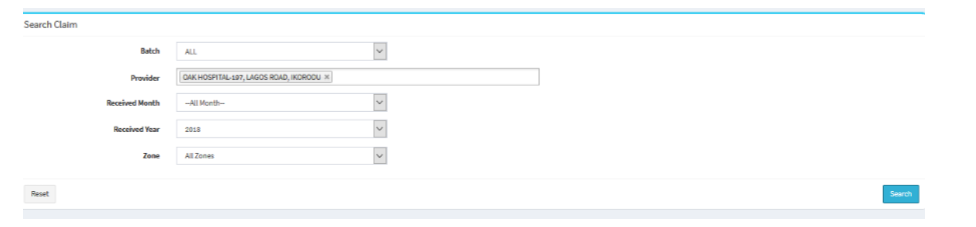
Search with the search filters
Scroll to the right and Click on Expand Batch
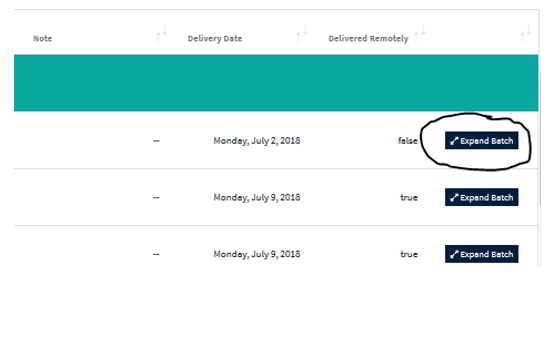
Click on blue button (Export Payment Advice)
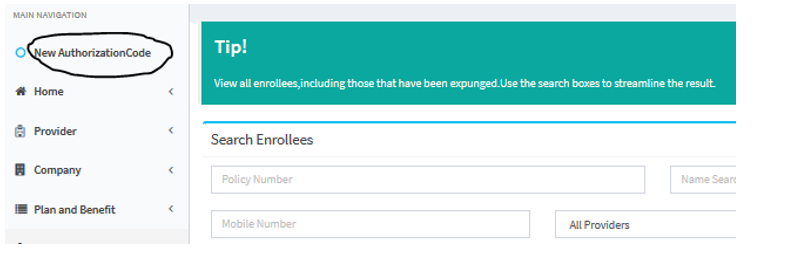
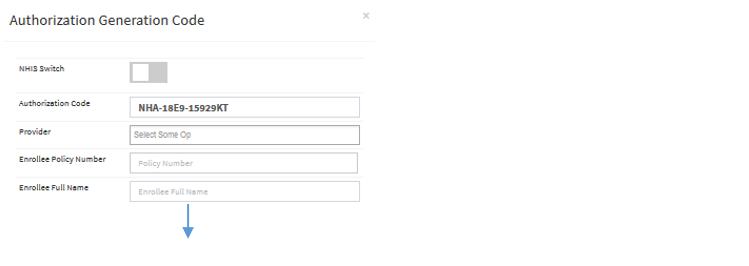
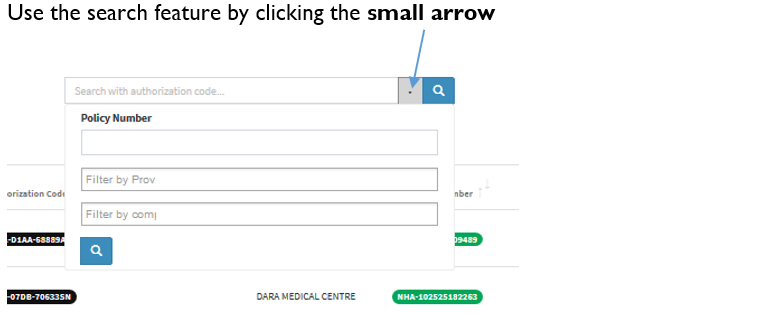
New Authorization code
To generate new authorization code, click on New Authorization code
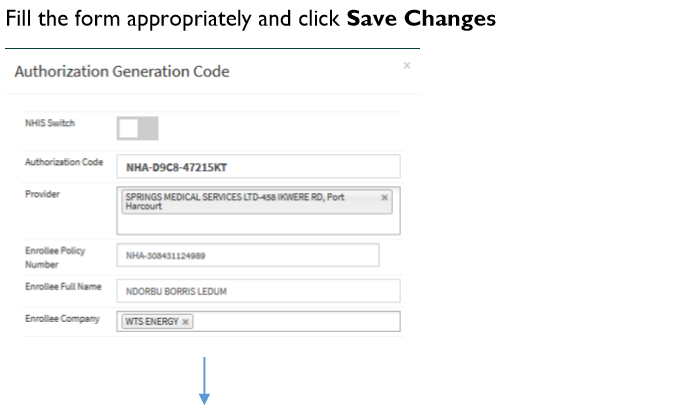
Fill the form properly and click Save Changes

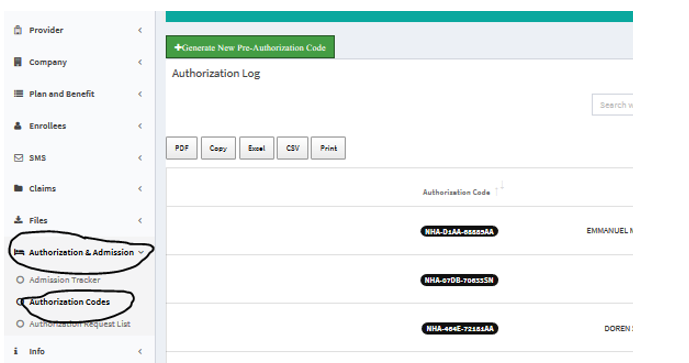
View Authorization Codes
Click on Authorization and Admission/Authorization codes
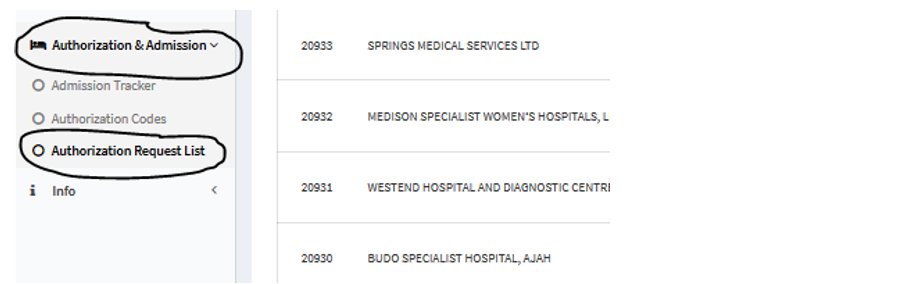
Respond to Secondary Authorization sent Via Novo Hub
Click on Authorization & Admission/Authorization Request List
Scroll to the right after identifying the enrollee to give code and click Give Code
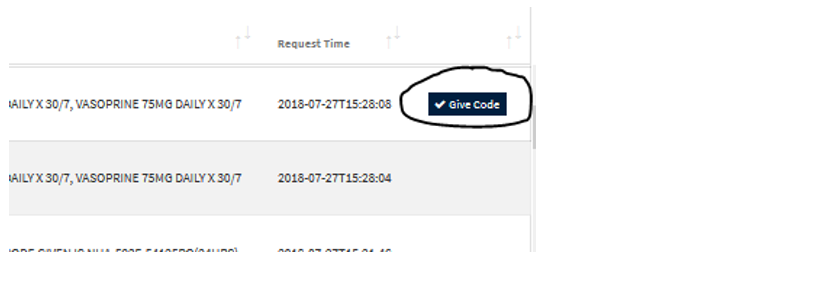
A notification is automatically sent to the Provider and the Blue button (Give Code) disappears
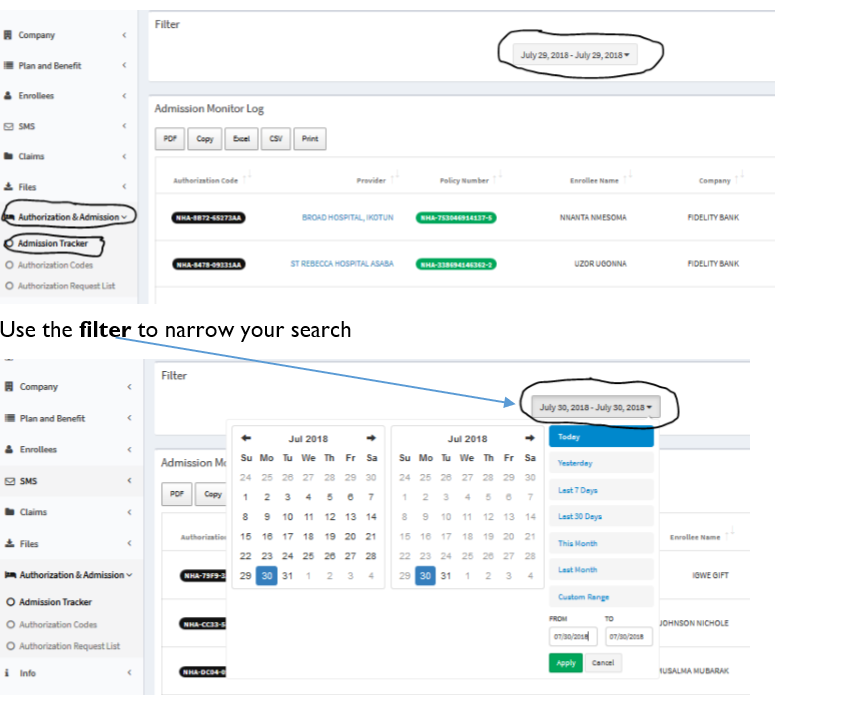
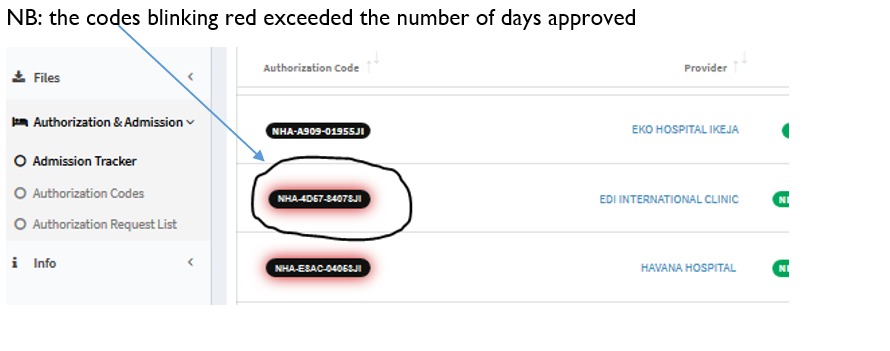
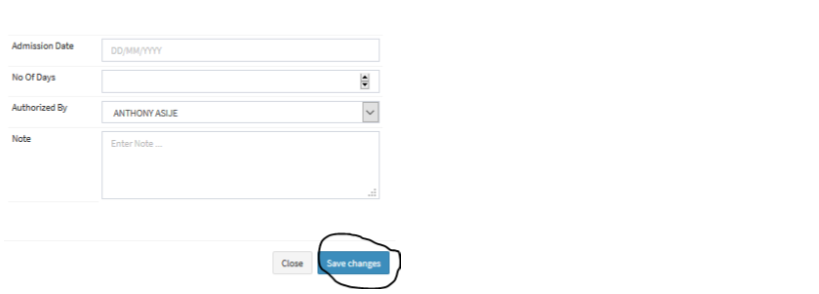
Admission Tracker
To track admission already logged in, click on Authorization & Admission/Admission Tracker